Rice and Grains
The pressure cooker is an amazing tool for a wide variety of rice and grain dishes.
Because the pressure pushes the starch to the outside of the grain it is brilliant for risotto. It is also great for preparations where you want the rice to stick together a little, for example Asian-style white rice to be eaten with chopsticks. Leftover rice is perfect the next day for stir-fries or can be easily reheated in the microwave. The pressure cooker is not the best piece of equipment if you want to make a rice pilaf, with fluffy texture, each grain separate.
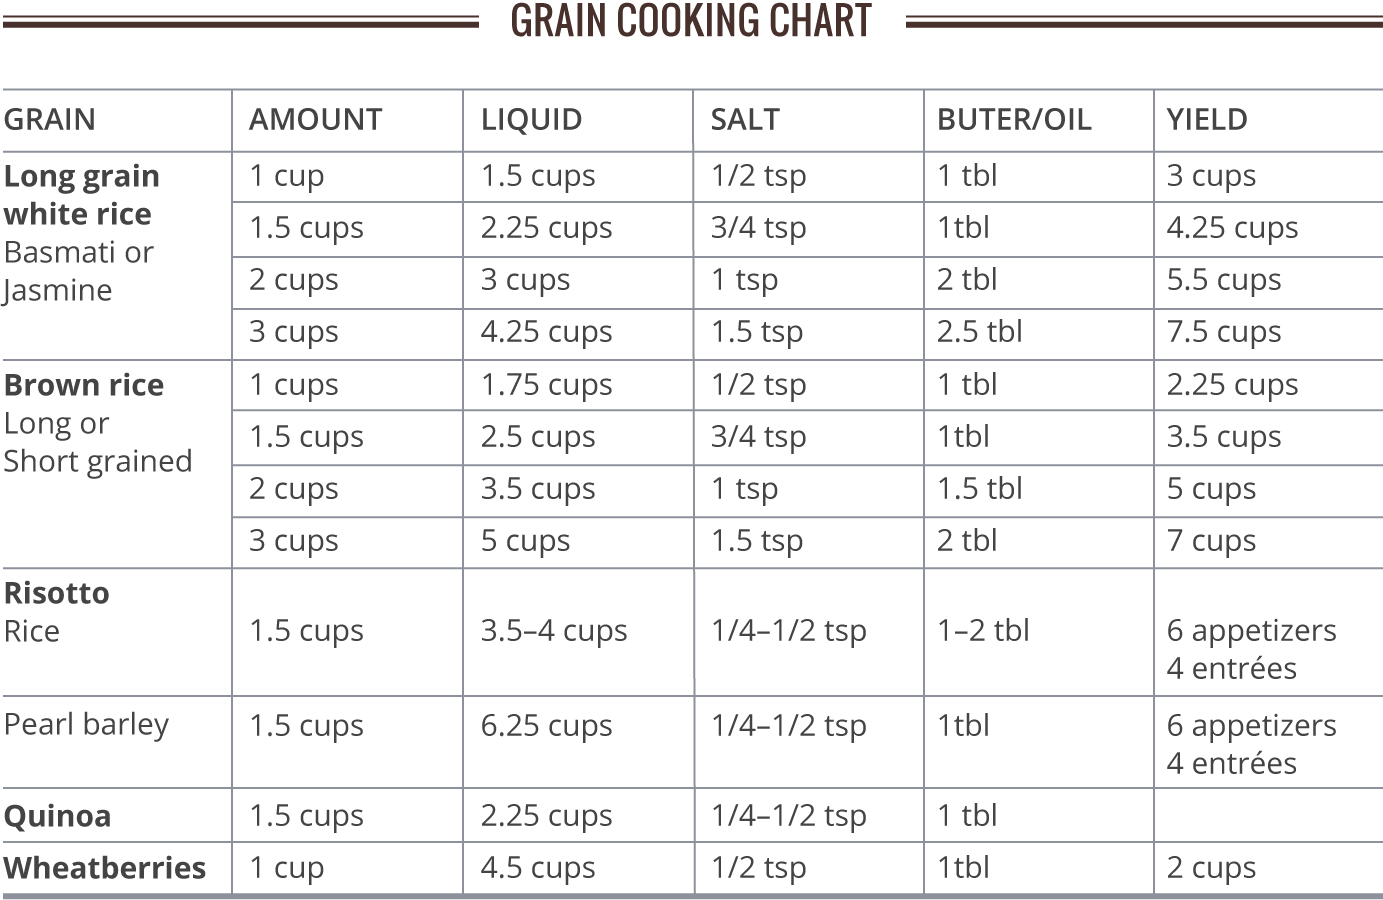
The liquid for these recipes could be a combination of water, broth, coconut milk, or tomato juice. If using commercial broth or bouillon you may not need to add any additional salt. Depending on what flavor profile you are creating, you could add a bay leaf, cinnamon stick, or fresh ginger, or sauté the rice with curry powder, paprika, saffron, or other spices before adding the liquid. Personally I prefer the natural goodness of the grain cooked in lightly salted water with a little oil or butter to control the foaming action.
Long grain white rice
Rice cooked in the pressure cooker brings out the best qualities of the grain in addition to being simple and fast. I use basmati or jasmine rice, depending on the rest of the meal. The cooking charts will get you started. Refer to them for the correct ratios of ingredients and timing for different rice and grains. They are based on Lorna Sass’s book. You may need to slightly adjust the timing or amount of liquid once you’ve gotten to know your particular pressure cooker.
Put the rice, liquid, butter or oil and salt into the pan, stir, and lock the lid in place. Turn the heat on full force. Timing begins when high pressure has been reached; reduce the flame. Cook on high pressure for three minutes. Remove from the heat and let the pressure drop naturally for seven minutes. Quick release any remaining pressure by running cold water over the lid. Fluff and taste the rice. If it is not quite done, replace the lid and steam in the residual heat, off the burner, for a few more minutes.
Long or short grain brown rice
Pick over, rinse, and drain the brown rice. If you want an especially chewy texture, use short grain rice. Sauté the washed grains in butter or oil for a few minutes; this will enhance the nutty taste and keep the grains from clumping. Add the appropriate amount of liquid and salt. See the cooking chart. As with white rice, you may need to slightly adjust the timing or amount of liquid for your particular pressure cooker.
Timing begins when the gauge on top of the cooker indicates high pressure. At this point immediately reduce the flame. Cook on high pressure for 15 minutes. Remove from the heat and let the pressure drop naturally for 10 minutes. Quick release any remaining pressure by running cold water over the lid. Fluff and taste the rice. If it is not quite done, replace the lid and steam in the residual heat, off the burner, for a few more minutes.
Risotto
Risotto can be the centerpiece of a luxurious dinner or it can be casually and quickly prepared with some tasty bits of cheese or meat that are left over in your refrigerator. Risotto can make a great first course for an elaborate dinner party. It can be served on a table set with fine linen, elegant china and wine glasses, a good bottle uncorked and waiting, or it can be easily cooked and eaten in your bathrobe, straight out of the pot. You can achieve a rich creamy texture without the use of a great deal of butter, cream, or cheese, or those ingredients can be delicious enhancements. Leftovers reheat well in the microwave, or you can form cakes, brush them with butter, and bake in the oven or pan-fry on the top of the stove.
The problem traditionally has been the time the cook needs to spend in the kitchen at the last minute, constantly stirring, while simultaneously trying to accommodate guests who have just arrived. The pressure cooker solves all these problems and makes fantastic risotto (OK, I’m just going to put it out there), definitely as good as the traditional method.
Pressure cooking is also a great choice when cooking for one.
Quick + one pot + excellent for using small bits of meat, vegetables, or sauces accumulating in your refrigerator. = friend to the solo diner
The solo diner can eat one portion as soon as it’s ready, and enjoy the rest later in the week in a different but equally delicious incarnation like risotto cakes.

Beans
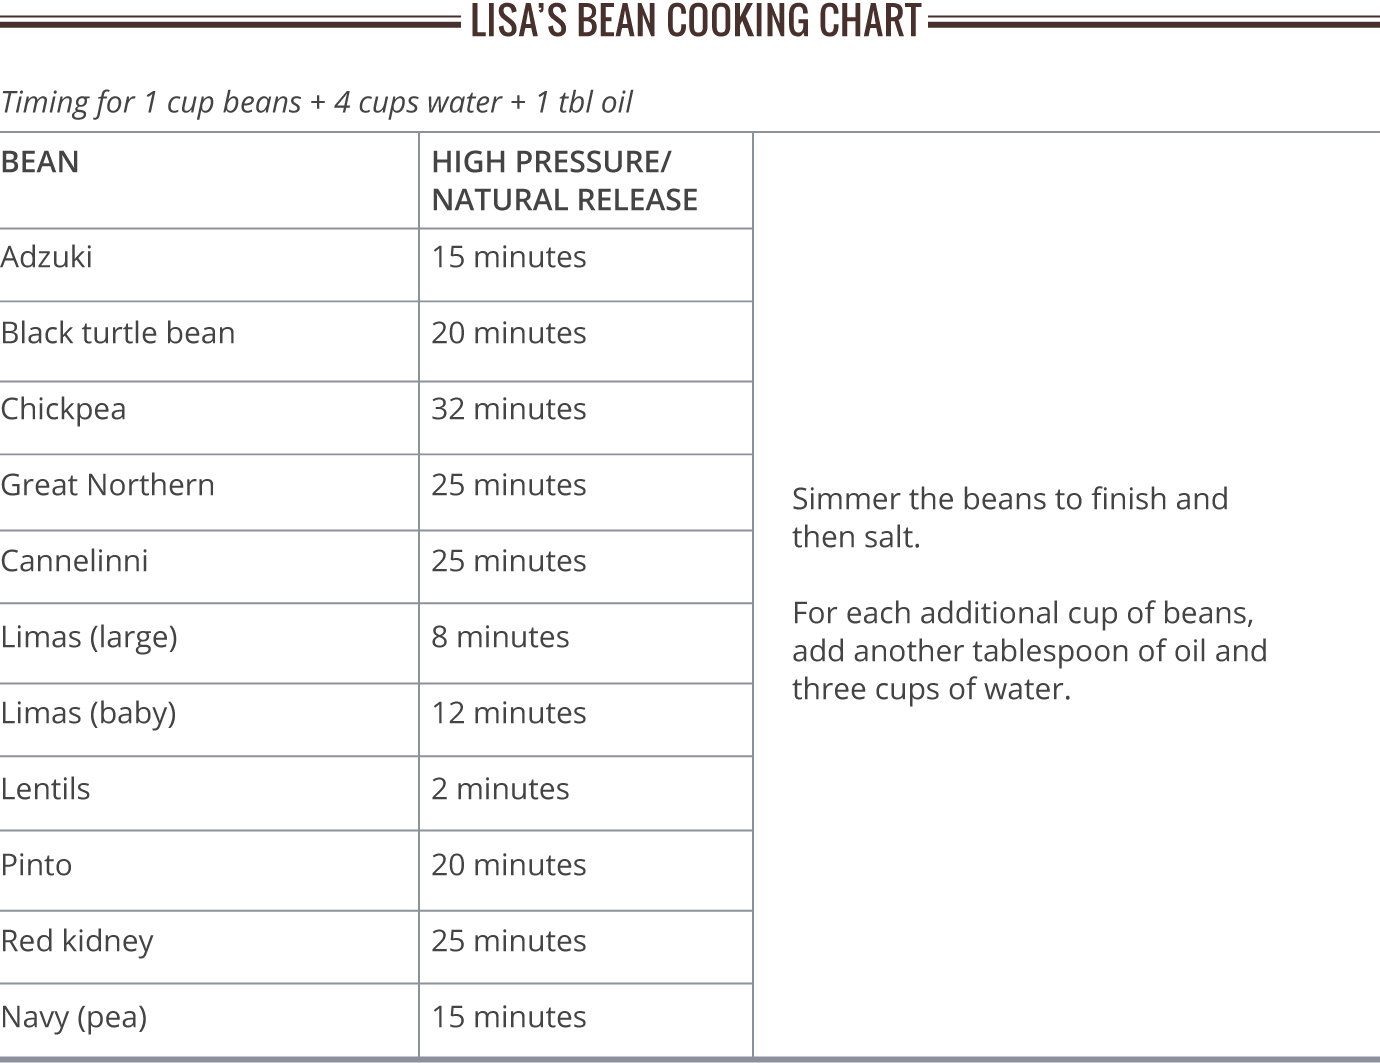
I had trouble with beans in the pressure cooker at first. It cut down the amount of time it took to cook them but I didn’t like the final product. For the first time, Lorna Sass’s timing charts failed me. Then I started cooking the legumes just three quarters of the way under pressure and simmering them with the lid off to finish. This took a little longer but still considerably reduced the overall time. It also really improved the texture. Use my cooking chart for ratios of ingredients and timing, depending on the type of legume. Some other pointers:
- It’s very important not to use the quick release method, which causes the beans to burst.
- Do not add salt until the beans are cooked to the desired texture since salt will toughen the skin.
- Always cook them with some oil to control the foaming action.
- Use 1 cup of beans to 4 cups of salt-free liquid and 1 tablespoon oil. You can add onion, garlic, thyme, epazote; whatever combination of herbs and aromatics you like.
Do not fill the pot over the maximum fill line.